Comanche Warrior, Albrecht AE495S, AE497S Freq Expansions
There are a few different methods documented, I have inlcuded all of them
here.
How to set up for HAM band only or CB/HAM mode.
This first version may not be correct, if it does not work for you try the
second version of the mod below.
- Disconnect the power cord.
- Remove mini jumper on the CN1 of front PCB.
- Short two terminals of SMT3 momentarilly to discharge capacitor and reset
CPU.
- Reconnect power cord.
HOW TO GO TO CB MODE FROM HAM BAND MODE
- Set 'FUNC' button on and press number '2' (call) button for longer than
3 seconds.
- Now pressing '2' button will switch between bands, A B C D E F G H I J.
- Set 'FUNC' button on and press '2' button for less than 3 seconds.
- Now you can toggle between frequency and channel display modes.
- Set 'FUNC' button and press '2' for longer than 3 seconds to go to Ham mode.
This version was sent to me by a visitor and is confirmed as working on
his unit.
- Unplug power cord!
- Carefully remove Warranty Seals (if you use a hair-dryer to warm them, they
come off very nicely, what a joke!) and remove cover from radio.
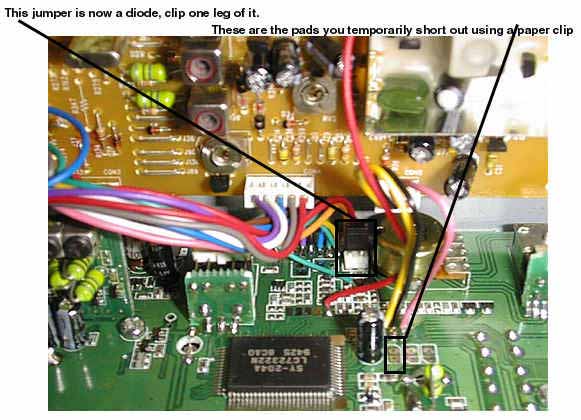
- As you look toward the front vertical PCB you will see the 204 CPU mounted,
just below and to the right (looking from the front down into chassis) you
will see a small diode, it is near the bottom of the vertical PCB.
- This radio is primarily a SMD design and the diode is a conventional diode,
clip it!
- Go to the CPU and on the right hand end you will see a tinned pad at each
corner of the chip, short them out!
- Carefully replace the screws and the Warranty Seals.
- Repower the unit.
- Turn it on.
- Tap the FUNC button, hold button #2 for at least 3 seconds, and there
it is... Channel 9!
- Tap the Func button and tap the Call (#2) button and you will see the frequency
displayed! Reach out and touch someone FreeBander!
This version is different from the first version above, there are two (2) jumpers
bridge on the back of the main board called "Con1", it is not located
on the front PCB, and the does not seem to be any "pads" named "SMT3"
to short out the CPU.
Thank you to Col. Victor Xavior-Stevenson, RAF (ret), for sending me this, who sadly passed away on February 5th 2002, I am sorry that I did not get the chance to meet you too, CQ DX.
The mod below was sent to me by Ed, it may help a lot of people !
Channel Expansion

| Band |
CN1 (Diode) |
Frequency Range |
| HAM |
Installed |
28.000 - 29.690 |
| HAM and CB |
Removed |
28.000 - 29.690 (HAM) |
| |
|
25.165 - 29.695 (CB) |
- Disconnect power supply from radio.
- Modify programming on CPU as shown in table above.
- RESET THE CPU by shorting out the pads (SMT3) as shown in above picture.
- Reconnect power supply and turn radio on, the HAM frequency will be displayed.
- Press FUNC and then press 2 (Call) for more than three seconds, the radio
now operates in 454 channel CB mode showing only channel numbers.
- For HAM mode repeat step 5.
- For frequency display press FUNC and 2 (Call),.
- For channel display repeat step 7.
- Button 2 (Call) switches between 454 channel CB mode and HAM mode.
Power and Modulation Adjustments
| Adjustment |
Controls |
Adjust for |
| RV4 |
AM power |
Adjust for maximum power in AM |
| RV5 |
AMC |
Adjust for maximum modulation in AM |
| RV14 |
ALC |
Adjust for maximum power in SSB |
This counter shows the number of hits since the
9th June 1999

Go Back To The Modifications
Page
Go Back To The Home Page
Go Back To The Main Home Page
Copyright © RadioMods 1997-2024
https://www.radiomods.co.nz/

