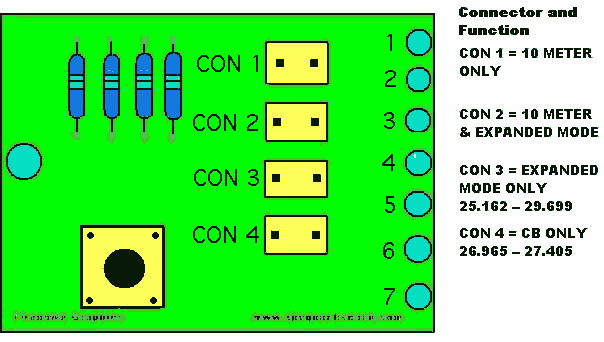
(I had to fix up the image a bit, original image was a bit messy)
I found this mod on The Quack Shack forum.
Short description:
1.Turn on power for a minimum 10 seconds then shut off and disconnect power
2.Remove cover (Speaker side).
3.Locate the jumper pins as shown in picture, set the jumper to the required position.
4.Press the CPU reset button that is on the same PCB for 10 seconds.
5.Button back up and power it up.
Long (detailed) description:
Make sure the radio is off and disconnected from power. After selecting the desired frequency set up, press the CPU reset switch SW1 for 10 seconds.
MOVE THE SHORTING SHUNT TO THE DESIRED CONNECTION
The pic below gives a self explanitory overview of the connections and thier functions with the exception of a few notes that I will list here per connection.
CON 1: Default mode, all functions operate
CON 2: 10M and Expanded Mode. When you turn the radio on it defaults to 10M. For the Expanded Mode, press FUNC and CALL for 3 seconds. Repeat these steps to return to 10M.
CON 3: Expanded Mode Only. The frequency range is grouped in 10 bands of 40 channels each. (Letters A --J) Band "E" is CB. To switch bands QUICKLY press the CALL button. (DON"T HOLD IT DOWN)
CON 4: CB mode, operates on the regular CB frequencies of 26.965 -- 27.405MHz.
Expanded mode notes:
On the Channel Display, the small number 0 - 9 to the right of the band letter is the 1KHz freq display. For instance, lets say you're on 27.405 MHz. The Display will read 40 E5, which means you're on Channel 40, Band "E" and the "5" is the 1KHz position of 27.405.
In Expanded mode the RPT and SHIFT don't work.

(I had to fix up the image a bit, original image was a bit messy)
This counter shows the number of hits since the 1st November 2004
Copyright © RadioMods 1997-2024